Last updated: August 10, 2026
A DIY golf simulator is one of the most satisfying builds in home sports, because the parts are simple and the result is a room where golf happens all year. Strip the mystique away and every simulator, from a taped-off garage bay to a commercial studio, is the same five elements: space, something to hit into, a mat, a tracking device, and software to draw the shot. Building it yourself means choosing each element deliberately instead of paying someone to choose for you.
This walkthrough takes the build in the order experienced self-builders use, the order that prevents expensive backtracking. Measure first, plan the layout second, and let the electronics arrive last. Nothing here requires advanced carpentry; it requires a tape measure, patience, and honesty about your room.
Quick Answer
How do you build a DIY golf simulator?
- Verify the space first: most golfers need roughly 9 to 10 ft of ceiling and free swing width, measured under the lowest obstruction at the hitting spot.
- Build in order: layout, hitting zone, screen or net, then tracking and software last, so the room shapes the gear list instead of the reverse.
- Budget the software layer with the hardware: course play often needs a membership or license, and it changes what your build can do on day one.
The Build, Step by Step
Save this sequence; it is the whole project on one screen. Each step protects the ones after it.
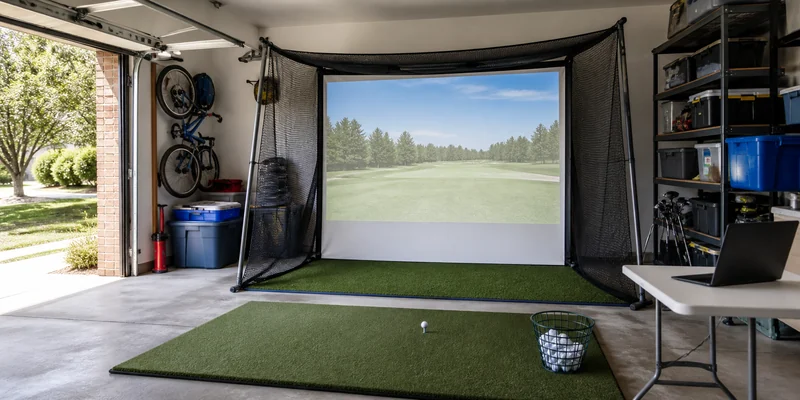
- Qualify the room. Take your longest club to the planned hitting spot and swing slowly. You need clearance to the ceiling, the walls, and anything that hangs; roughly 9 to 10 ft of ceiling suits most golfers for a driver. Measure under the lowest duct or fixture, not the open ceiling, and remember an iron-only build is a legitimate fallback for marginal rooms.
- Plan the layout on the floor. Decide the hitting line, where the ball sits, where the screen or net hangs, and where the launch monitor will live. Radar monitors sit behind the ball and want flight room in front; camera units sit close to the hitting zone. Use painter’s tape to mark everything and walk the room before buying.
- Prepare the hitting zone. A quality hitting mat is the one component your body meets on every swing, so it deserves real budget. On concrete, add rubber or foam tiles around it; the standing area matters more than it looks.
- Hang the catch layer. A freestanding net is the fast, budget route; a framed impact screen is the immersive one. Either way, respect the listed clearance behind it so shots are absorbed quietly and safely, and never assume any net catches every conceivable miss.
- Add tracking. Install the launch monitor at its listed distances, then mark its position with tape so the geometry repeats every session. Consistent placement matters more to data quality than most upgrades.
- Connect display and software. Start with a laptop, tablet, or TV; a projector can come later. Install the software your monitor supports and note which features need a paid tier before you count on them.
- Light and protect. Even, indirect light at the hitting area helps camera tracking and the on-screen image. Pad hard edges near the swing, and keep spectators fully behind the hitting line.
- Test in stages. First slow swings, then wedges, then longer clubs, watching where mishits actually go before trusting the room. Adjust the layout while the tape is still cheap to move.
Choosing Your Build Level
DIY covers three honest tiers, and knowing yours before shopping keeps the project sane. The practice bay is a net, a mat, and a monitor: an afternoon of work and the cheapest complete build. The screen bay swaps the net for a framed impact screen and adds a projector: a weekend of work, and the tier where a room starts feeling like a simulator. The finished studio adds enclosure sides, turf flooring, lighting, and acoustic padding: a multi-weekend project that competes with pre-built rooms at a fraction of the labor cost.
The right tier is set by the room and your patience, not ambition. A shared garage bay argues for the practice tier that packs away; a dedicated basement corner rewards the full studio. What actually drives the spend at each tier is broken down in our simulator cost explainer, and the frame-building specifics have their own guide in the DIY enclosure walkthrough.
The Decisions Inside the Build
Three choices inside the sequence deserve extra thought. Net versus screen is budget versus immersion, but it is also sound: a taut screen thumps, a net whispers, which matters under bedrooms. Radar versus camera tracking is mostly a room-shape question: radar wants depth, camera tolerates tight bays, and both reward the consistent placement from step five. Projector versus TV is the easiest to defer; every build works with the display you already own, and the projected fairway is a clean later upgrade once the throw distance is known.
Software is the fourth decision hiding inside the third. Course play on most platforms involves a membership, license, or tiered plan on top of the hardware, and platform support differs per monitor. Decide what you want evenings in the room to feel like, playing rounds or grooving numbers, and let that pick the platform before the platform picks your monitor.
Make It Yours: The Practical Layer
What separates loved DIY builds from abandoned ones is rarely the gear; it is friction. Builders who tape monitor positions, leave the mat permanently placed, and keep clubs in the room practice constantly; builders who rebuild the setup each session drift away by spring. Spend your cleverness on making the room thirty-seconds-ready.
The same goes for comfort: a fan for summer, safe heat for winter, a stool between swings, somewhere to put a scorecard and a drink. None of it is golf equipment and all of it decides usage. If you want to see what finished self-builds look like when this layer is done well, owners share the full journey from empty corner to studio, and the buying side of every component is collected in our guide to the best golf simulator for home.
Common Mistakes to Avoid
- Buying gear before qualifying the room. The garage sale of half-used simulator parts is always someone who skipped step one. Measure under the lowest obstruction first.
- Mounting the screen flush to a wall. Impact screens need their listed clearance behind them. Skipping it is loud, hard on the screen, and occasionally hard on the wall.
- Chasing accuracy with inconsistent placement. A launch monitor moved randomly between sessions produces data you cannot compare. Tape marks cost nothing and fix it permanently.
- Ignoring what mishits do. Test with slow swings and watch real misses before trusting the layout. Side netting and padding exist because shanks exist.
- Leaving software as an afterthought. Platform support and paid tiers vary by monitor. Discovering your dream software needs different hardware is the most avoidable DIY heartbreak.
Ready to Start Building?
Two reads make the physical build safer and smarter: the room dimensions guide for the clearance math your space must pass, and the DIY enclosure walkthrough when you reach the frame-and-screen weekend. When the room is running and numbers start appearing on the screen, launch monitor numbers explained turns them into something your practice can use.
Frequently Asked Questions
Is it cheaper to build a golf simulator yourself? Generally yes, mostly through labor and choosing each component to your actual needs. The savings grow at the studio tier, where pre-built rooms carry significant assembly and markup costs.
What is the hardest part of a DIY simulator? Not the construction; the discipline of measuring and layout before buying. The physical work is mostly assembling a frame, hanging fabric, and running cables.
Can I build one in a low room? If slow swings with your chosen clubs clear the ceiling, yes; many builders design deliberately around irons and wedges. The honest test is your swing under the real obstruction, covered in the room dimensions guide.
Do I need a projector for a DIY build? No. A laptop, tablet, or TV shows the same shot data and course view. The projector is the immersion upgrade, best added once the layout and throw distance are settled.
What software do DIY simulators use? Whatever the launch monitor supports: manufacturer apps, GSPro, E6 Connect, and similar platforms. Most gate full course play behind a license, membership, or tiered plan, so check the pairing before buying the monitor.
The Bottom Line
A DIY golf simulator is a measuring project before it is a building project: qualify the room, tape the layout, build the hitting zone and catch layer, then let tracking, software, and the projector arrive in that order. Follow the sequence and every dollar lands where it belongs, in a room you will actually use all winter.