Last updated: August 10, 2026
A DIY golf simulator enclosure is one of the most satisfying builds in home golf: a frame, an impact screen, and a weekend of work that turns one end of a garage or basement into a hitting bay. Builders go the DIY route for two honest reasons. It can cost meaningfully less than a comparable kit, and it produces an enclosure sized exactly to your room instead of the nearest standard footprint.
This walkthrough covers the full build in order: planning the space, choosing a frame approach, mounting and tensioning the screen, closing in the sides, and the finishing details that separate a solid bay from a wobbly experiment. No exotic tools required, just careful measuring and a helper for the frame day.
Quick Answer
How do you build a DIY golf simulator enclosure?
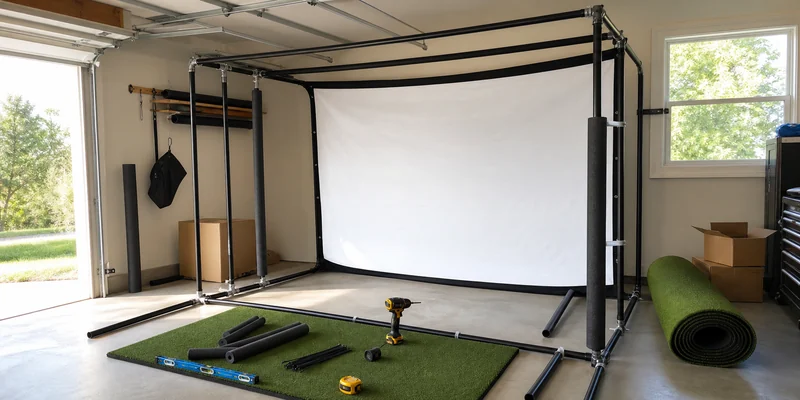
- Build a rectangular frame from metal conduit (EMT) or pipe fittings sized to your room, hang a real multi-layer impact screen inside it with ball bungees, and close the sides with dark netting or blackout fabric.
- Plan around your ceiling first: most golfers need roughly 9 to 10 feet of height to swing a driver comfortably, plus buffer space behind the screen.
- Buy the screen, build the frame. The screen is the one component you should not improvise.
The Build, Step by Step
Save this sequence; it is the whole project in one list. Each step is expanded below.
- Measure and plan. Confirm ceiling height, swing clearance with your longest club, bay width, and buffer space behind the screen. Sketch the frame dimensions before buying anything.
- Buy the impact screen first. Choose a multi-layer screen rated for real golf balls, then size the frame around the screen’s finished dimensions, not the other way round.
- Build the frame. Assemble a rectangular structure from EMT conduit with fittings, or pipe framing, anchored so it cannot creep or tip.
- Hang and tension the screen. Attach with ball bungees at every grommet or loop, tightening evenly around the perimeter until the surface is taut and flat.
- Close in the sides and top. Add side barrier netting or dark blackout fabric walls and a top valance to contain mishits and shade the screen from room light.
- Finish the bay. Position mat and launch monitor, mount the projector clear of the swing, and add lighting and padding around the structure.
- Test carefully. Start with soft or limited-flight balls, verify screen behavior and clearances, then step up to full swings.
Step 1: Planning the Space Honestly
Every failed enclosure build traces back to this step. Take your longest club and make slow, then full, practice swings where the bay will stand: if the club threatens the ceiling, no enclosure design fixes that room. Most golfers need roughly 9 to 10 feet of ceiling for a driver, more for tall golfers with upright swings. Width needs to cover your swing arc plus margin on both sides, and depth must hold the golfer, ball-to-screen distance, and buffer space behind the screen so it can flex without touching the wall.
Your launch monitor adds its own geometry, since radar units typically want space behind the ball and camera units sit beside or above it. Check your model’s required distances before fixing the layout. For the full measuring exercise, our room dimensions guide walks through every number with a tape measure in hand.
Step 2: The Screen Is the One Part You Buy Properly
DIY enthusiasm has a boundary, and it is the impact screen. Frames, walls, and valances forgive improvisation; the surface that stops a golf ball at full swing speed does not. Buy a purpose-made multi-layer impact screen with reinforced edges, sized so your frame can hold it with a border of tensioning space around it. Bed sheets, tarps, banner material, and single-layer netting all have documented failure stories behind them.
Size the screen to your projector plan as well as your room, since many screens run squarer than a widescreen image. If you have not chosen one yet, see what to look for in a golf impact screen before committing the frame dimensions.
Steps 3 and 4: Frame and Tension
The community-standard frame is EMT electrical conduit joined with steel or structural fittings: cheap, straight, strong for its weight, and cuttable to exact lengths at home. A simple rectangular face frame for the screen, with depth rails running back to a second rectangle or to wall anchors, produces a freestanding box that one helper and one afternoon can assemble. Pipe framing and lumber both work too; lumber builds heavier and less forgiving of relocation, pipe costs more but feels permanent.
Hang the screen with ball bungees through every grommet, starting at the corners and working around the perimeter in passes, tightening gradually and evenly like a drum head. Aim for taut and flat, not stretched rigid: over-tensioned screens are louder, bounce balls harder, and wear their edges early. Leave the screen’s bottom edge with slight freedom so balls drop and roll forward rather than trampolining back.
Steps 5 to 7: Sides, Finishing, and First Balls
Side containment is what upgrades a hanging screen into an enclosure. Dark barrier netting or blackout fabric panels along both sides catch the mishits that never threaten the screen, and a fabric valance across the top shades the screen from room light, which visibly improves the projected image. Black or very dark material is the standard choice because it disappears once the projector is running.
Finish the bay with the supporting cast: mat and monitor positioned per their requirements, the projector mounted out of the swing path, and light aimed at the hitting zone rather than the screen. Then test like a skeptic. Soft balls first, watching how the screen absorbs and drops them, a hard look at every clearance, and only then full swings with real balls. No screen or enclosure catches every conceivable mishit, so keep people, pets, and glass out of the line of play as a habit, not an assumption.
DIY or Kit: A Fair Comparison
Building is not automatically the right answer, so weigh it honestly.
| Factor | DIY build | Enclosure kit |
|---|---|---|
| Cost | Usually lower for comparable size, especially with conduit framing | Higher, but one purchase with matched parts |
| Fit | Sized exactly to your room, including odd corners | Standard footprints; your room adapts to the kit |
| Time and effort | A planning evening plus a build weekend | An afternoon of guided assembly |
| Result quality | Depends on your care, particularly screen tension | Consistent and predictable |
| Changes later | Easy to resize, repair, and extend | Limited to the kit’s design |
If the comparison tips you toward buying complete, the kit market is covered in our simulator enclosure guide. Budget planners will also want the wider cost picture in what a golf simulator costs.
Common DIY Mistakes to Avoid
- Improvising the screen. The frame is the DIY project; the screen is a purchase. This is the line between a smart build and a story.
- Framing before the screen arrives. Screens vary in finished size. Build the frame around the screen you actually own.
- Skipping the buffer zone. A screen flush to drywall transmits impact into the wall and back into the room. Leave real space behind it.
- Under-anchoring the frame. A structure that shifts a little each session loosens fittings and tension over weeks. Anchor to floor or wall from day one.
- Testing with a driver first. Prove the setup with soft balls and short clubs before your fastest swing meets your newest construction.
- Forgetting the projector’s needs. Throw distance and mounting position are enclosure decisions. Plan them with the frame, not after it.
Ready to Build?
The enclosure is one chapter of a larger project. The full build, launch monitor and software included, is walked through in our DIY golf simulator guide, and the room-planning numbers live in golf simulator room dimensions. Once the structure stands, lighting and wall padding is the finishing layer that makes it feel like a studio.
Frequently Asked Questions
Is a DIY golf simulator enclosure cheaper than a kit? Usually yes for comparable size, since conduit and fittings cost little and the screen is the main expense either way. The savings buy your time and care in return.
What is the best frame material for a DIY enclosure? EMT electrical conduit with fittings is the community standard: straight, strong, affordable, and easy to cut to exact lengths. Pipe framing and lumber both work with different weight and cost trade-offs.
Can I use a tarp or blackout curtain as an impact screen? No. Only a multi-layer screen rated for real golf balls should take full-speed shots. Improvised materials fail unpredictably, and what passes through them meets your wall.
How much space do I need behind the screen? Enough that the screen never touches anything at full flex; a foot or more is a common recommendation, and extra space quiets the bay further.
How long does the build take? Owners typically describe a planning evening, a frame-and-screen day with a helper, and a second day for sides, valance, and finishing. Careful tensioning is the step worth not rushing.
The Bottom Line
A DIY golf simulator enclosure is a conduit frame sized to your room, a properly purchased impact screen tensioned evenly inside it, and dark sides that contain mishits and ambient light. Plan around ceiling height, buy the screen before building the frame, and test gently before swinging hard. Do those three things and the weekend build stands up to years of golf.